
What is saddle stitch sewing? Where does it come from and what does it involve?
First, it’s important to know that saddle-stitch sewing is most often used for luxury leather goods. This method, highly prized by top-of-the-range houses, immediately suggests quality workmanship and a meticulous wort of art. It represents unique expertise, historically linked to leather working.
Accustomed to making their equestrian equipment by hand, the saddlers themselves first popularised the saddle stitch method. Once the stitching is complete and the pieces of leather are sealed, this age-old skill creates movement in your edging, giving your wire a 'slanted' appearance.
Even today, despite technological advances and the emergence of sewing machines capable of reproducing this method, the strength of handmade stitching remains unrivalled.
But how is this possible?
Unlike sewing machines, the saddle stitch is made using two needles and a single thread. The stitching is applied by placing each needle at the ends of the thread.
This detail ensures that each stitch is independent of the others. This means that if your thread breaks, only the stitch in question will be lost, without damaging the rest of your seam.
And that's not all! Hand sewing has another significant advantage over machine sewing: thickness. This means that hobbyists and private individuals alike can work with different leather thicknesses, sometimes thicker, without having to invest in a triple-drive sewing machine*. The output may be lower, but your wallet will thank you!
*Triple-drive sewing machine: an industrial machine that owes its name to its mechanism designed to sew difficult fabrics from above, below and through the needle.
Now that you know all the secrets of saddle-stitch sewing, it's time to get practical!
7 steps to hand stitching
Step 1: Cutting and gluing your leather pieces
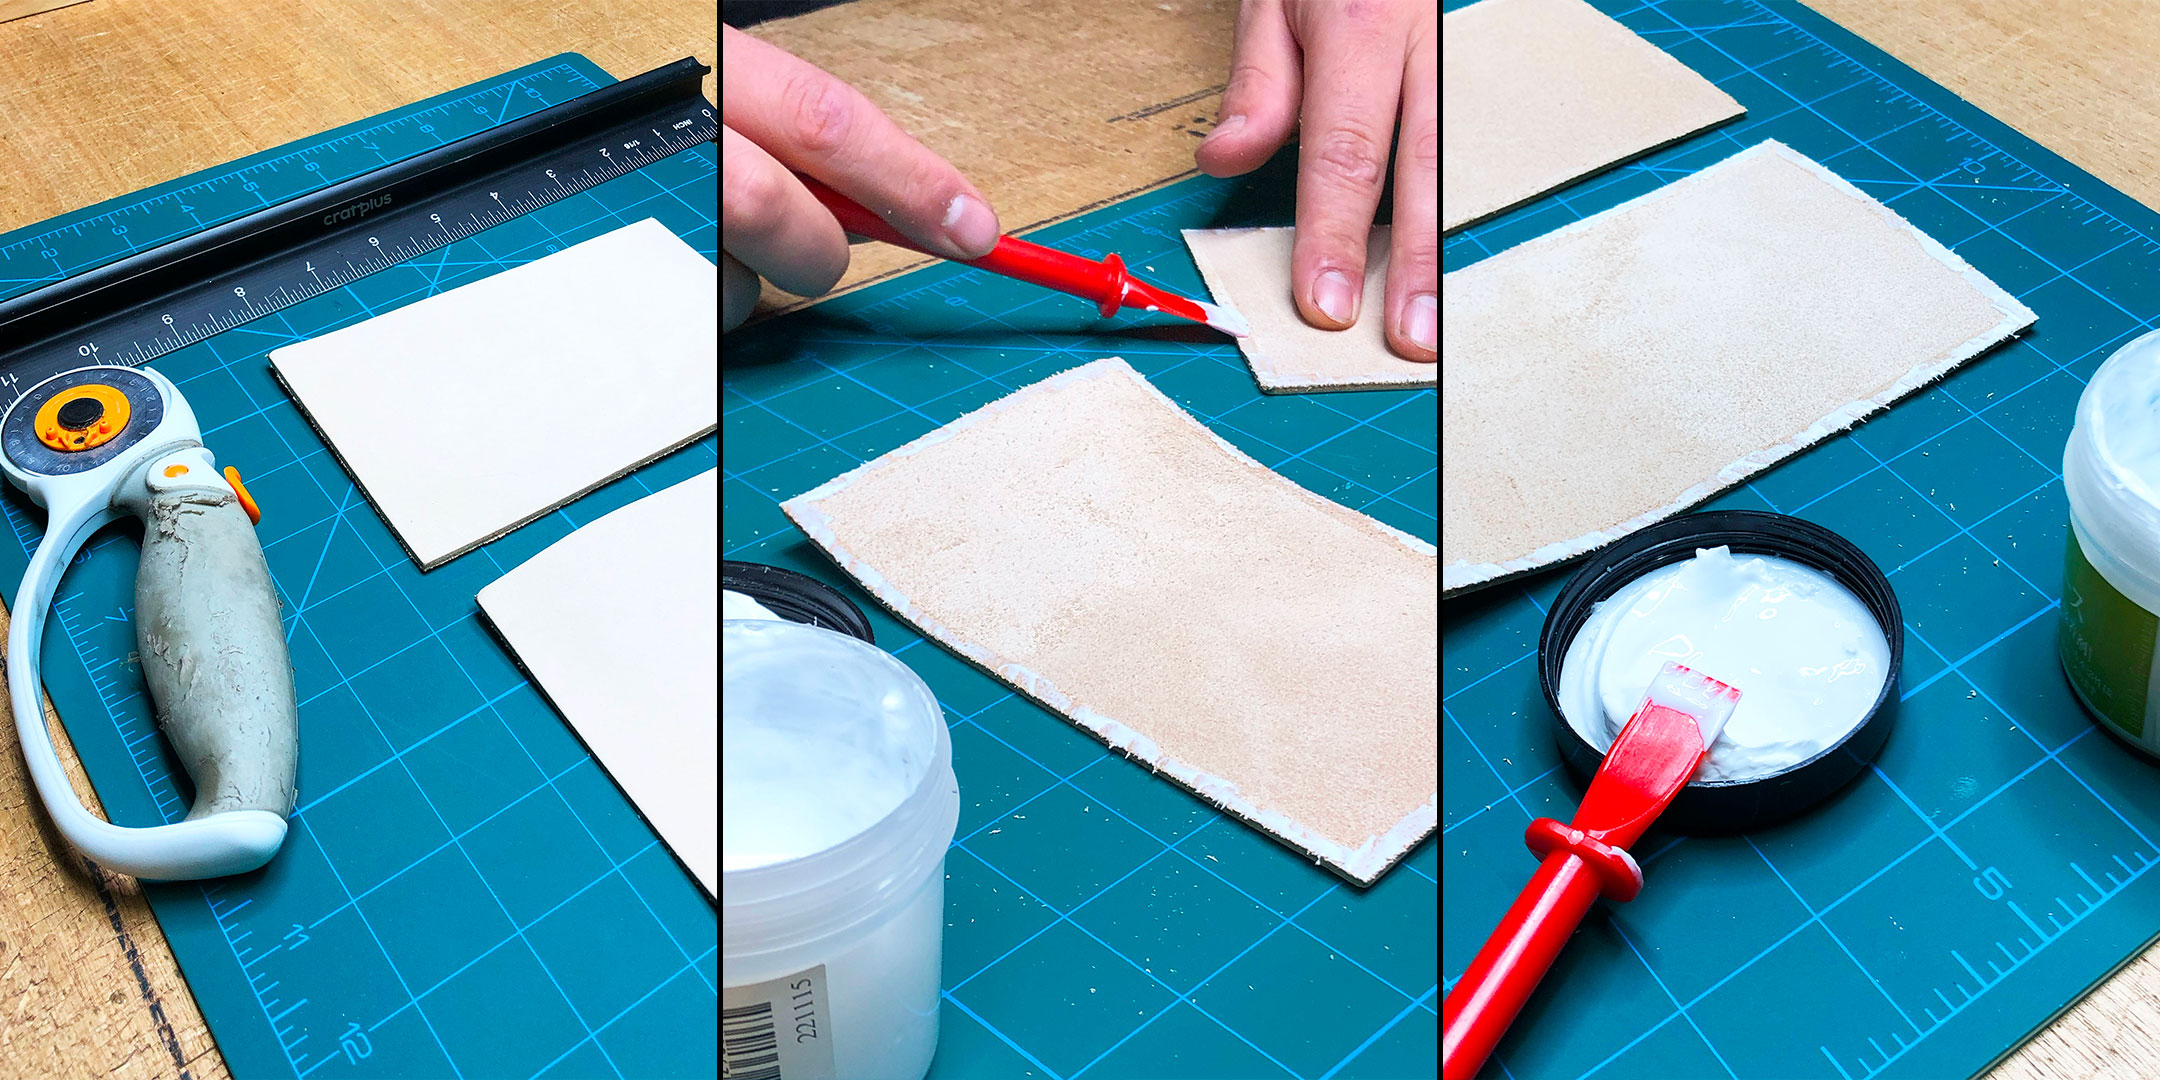
To get your sewing off to a good start, it's important to choose the right work surface. That's why you need to start by cutting out the pieces you need for your project.
Note that if you're just starting out, there's no need to waste large skins: two rectangles cut from scraps are more than enough. The important thing is to have about twenty centimeters to work with.
Once you've cut out your pieces, it's time to glue them! Glue your two rectangles together (here, we're using Seiwa water-based glue). Apply the glue to the edges of your two pieces (crust side) using a glue applicator. Leave to dry for around fifteen minutes.
Step 2: Prepare your seam line

Once your pieces are dry and well assembled, it's time to draw your seam line. To do this, trace your seam line using a hand sewing divider, a wing divider compass with dry point or a stitching groover. This will give you a precise reference point for a straight seam.
Don't sew too close to the edge; it's not aesthetically pleasing and you risk tearing your leather in the next step.
Step 3: Marking your sewing line with diamond punch holes
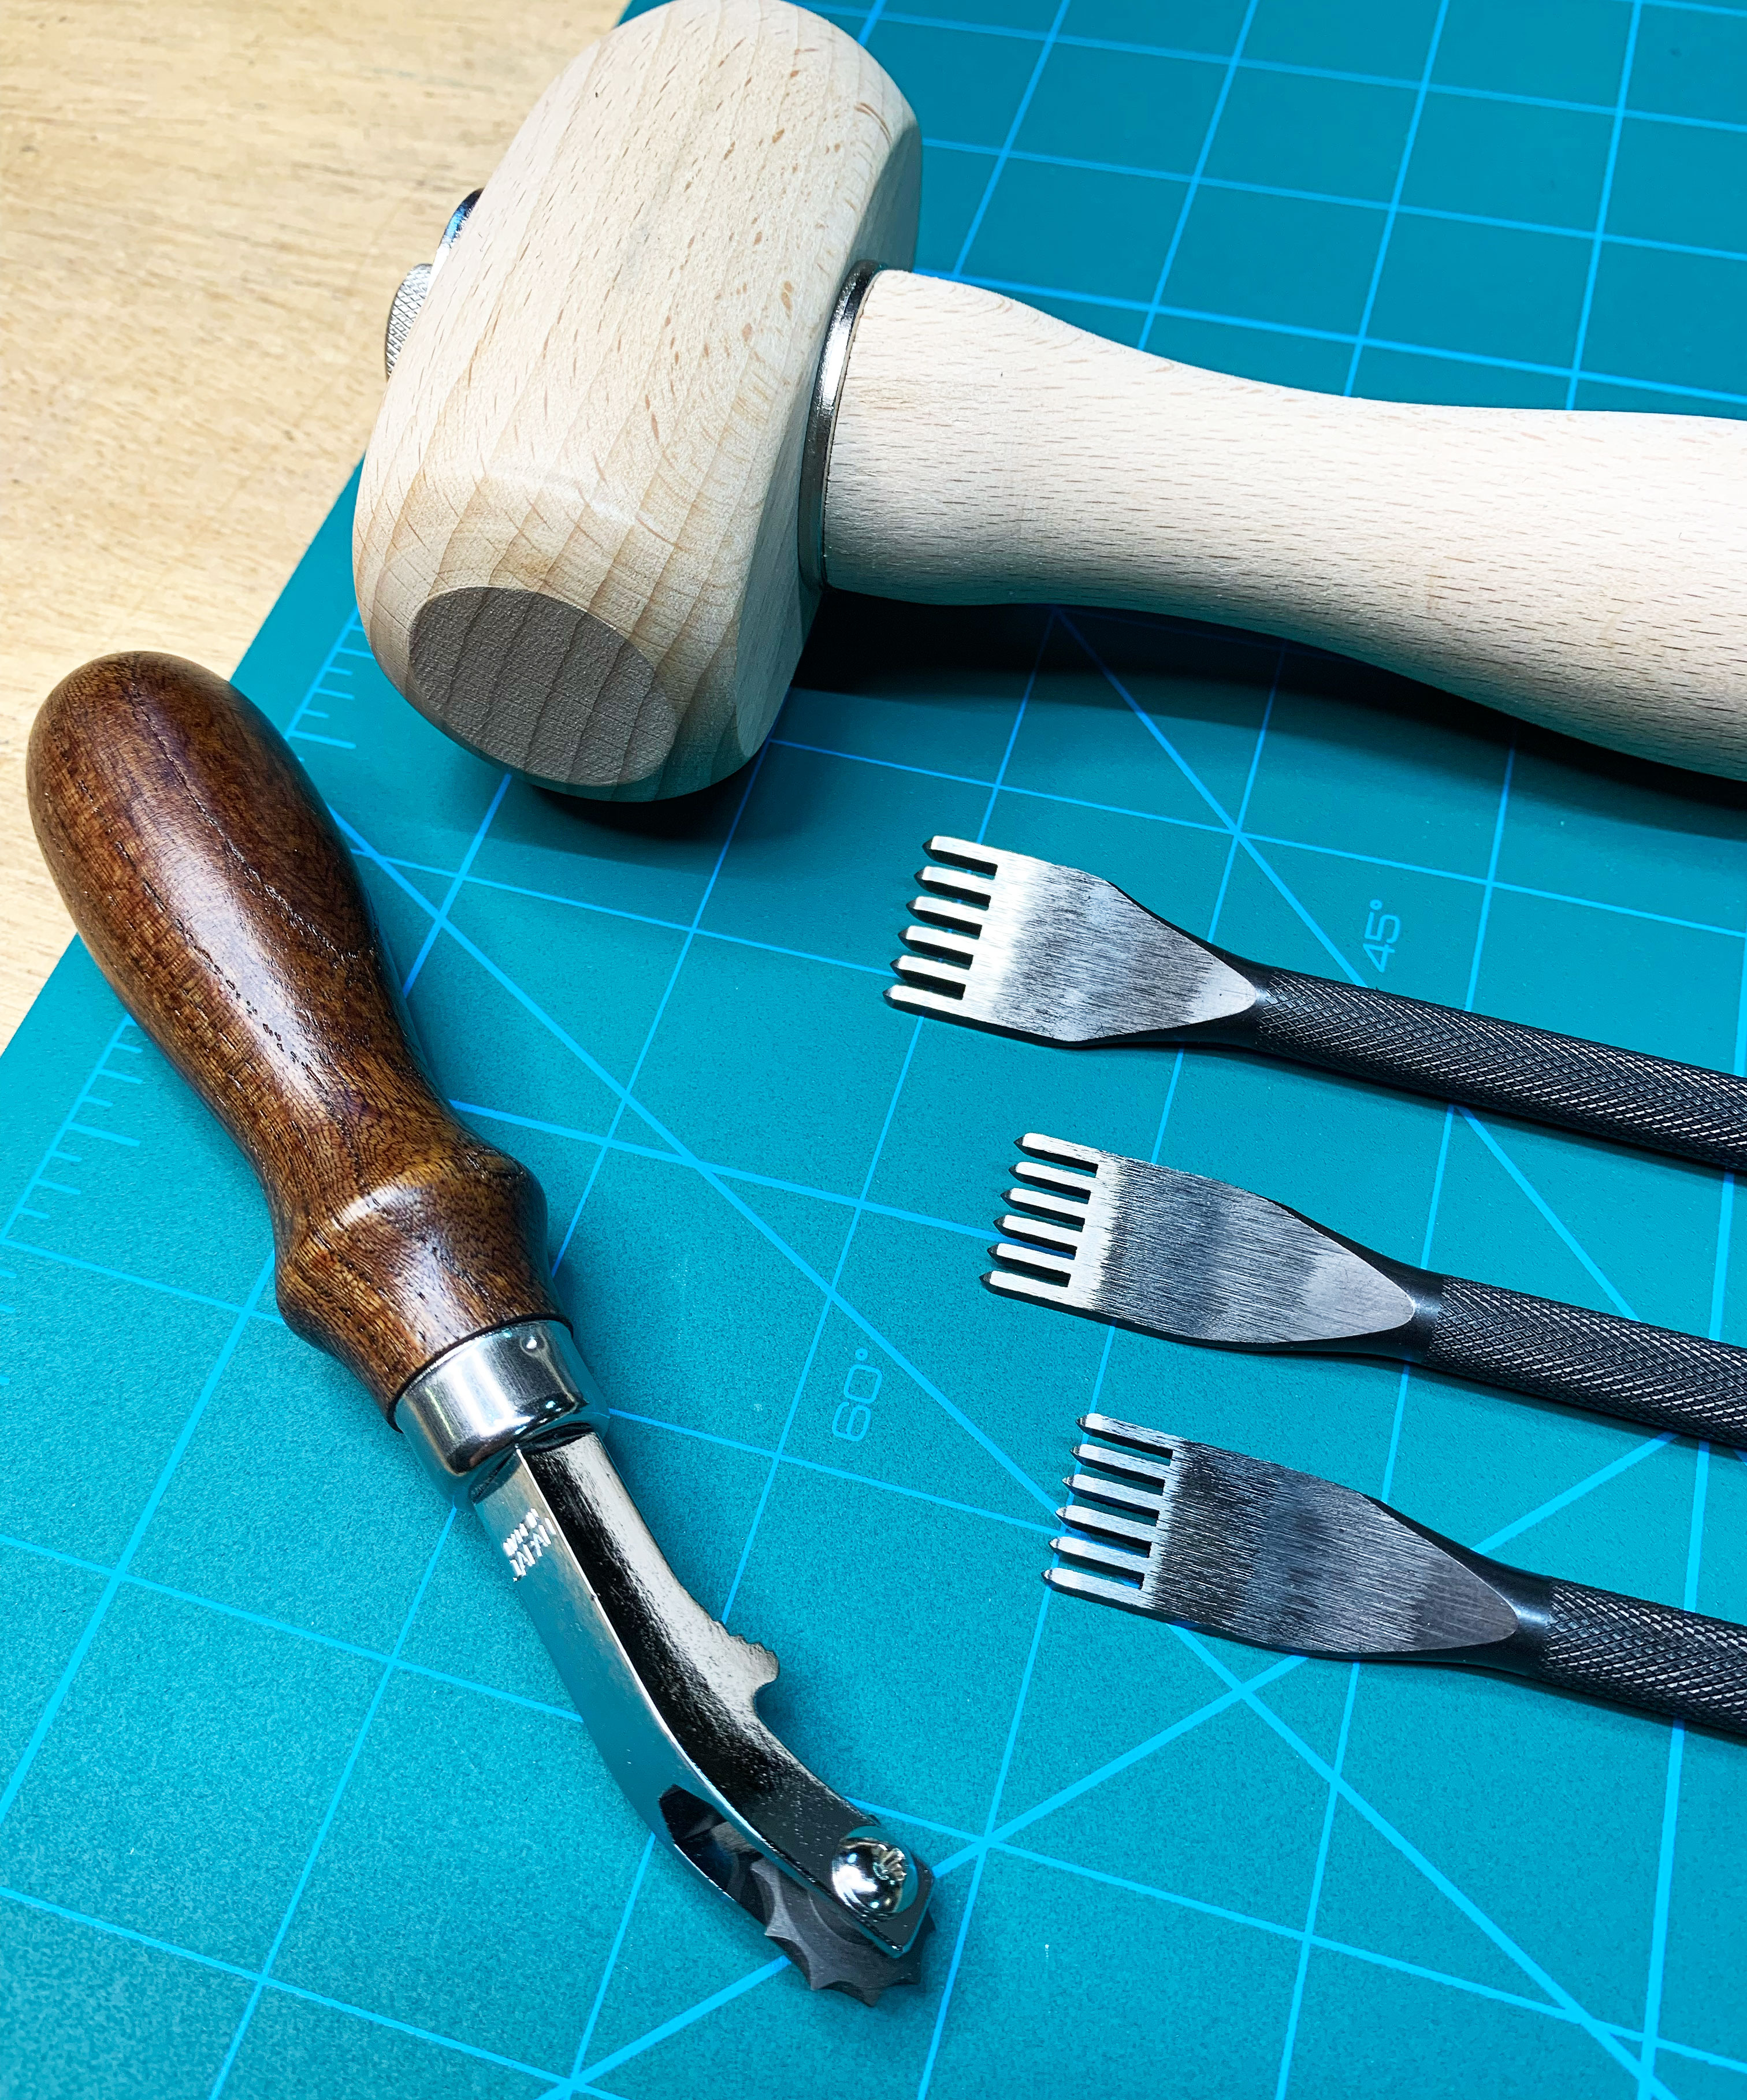
Now that your work surface is ready, it's time to mark your line. To do this, you can use diamond punch holes with a wood hammer maul, or directly a overstitch wheel.
Most of the time, when striking thin leather (up to 2.0mm thick), the force of the diamond punch holes is enough to penetrate the leather. But, when you're working with very thick leather (from 4.0 to 4.5mm thick), that's not enough. You need to pass again over your marks using a rounded blade stitching awl.
Don't rush! Take your time to make a straight line.
Tip :
When you mark a new stitch on your line, we advise you to always put 2 teeth on the previous marking to have a straight seam line.
Repeat this movement until you reach the end of your line, and you're done! Now it's time for the thread!
Step 4: Preparing the sewing thread
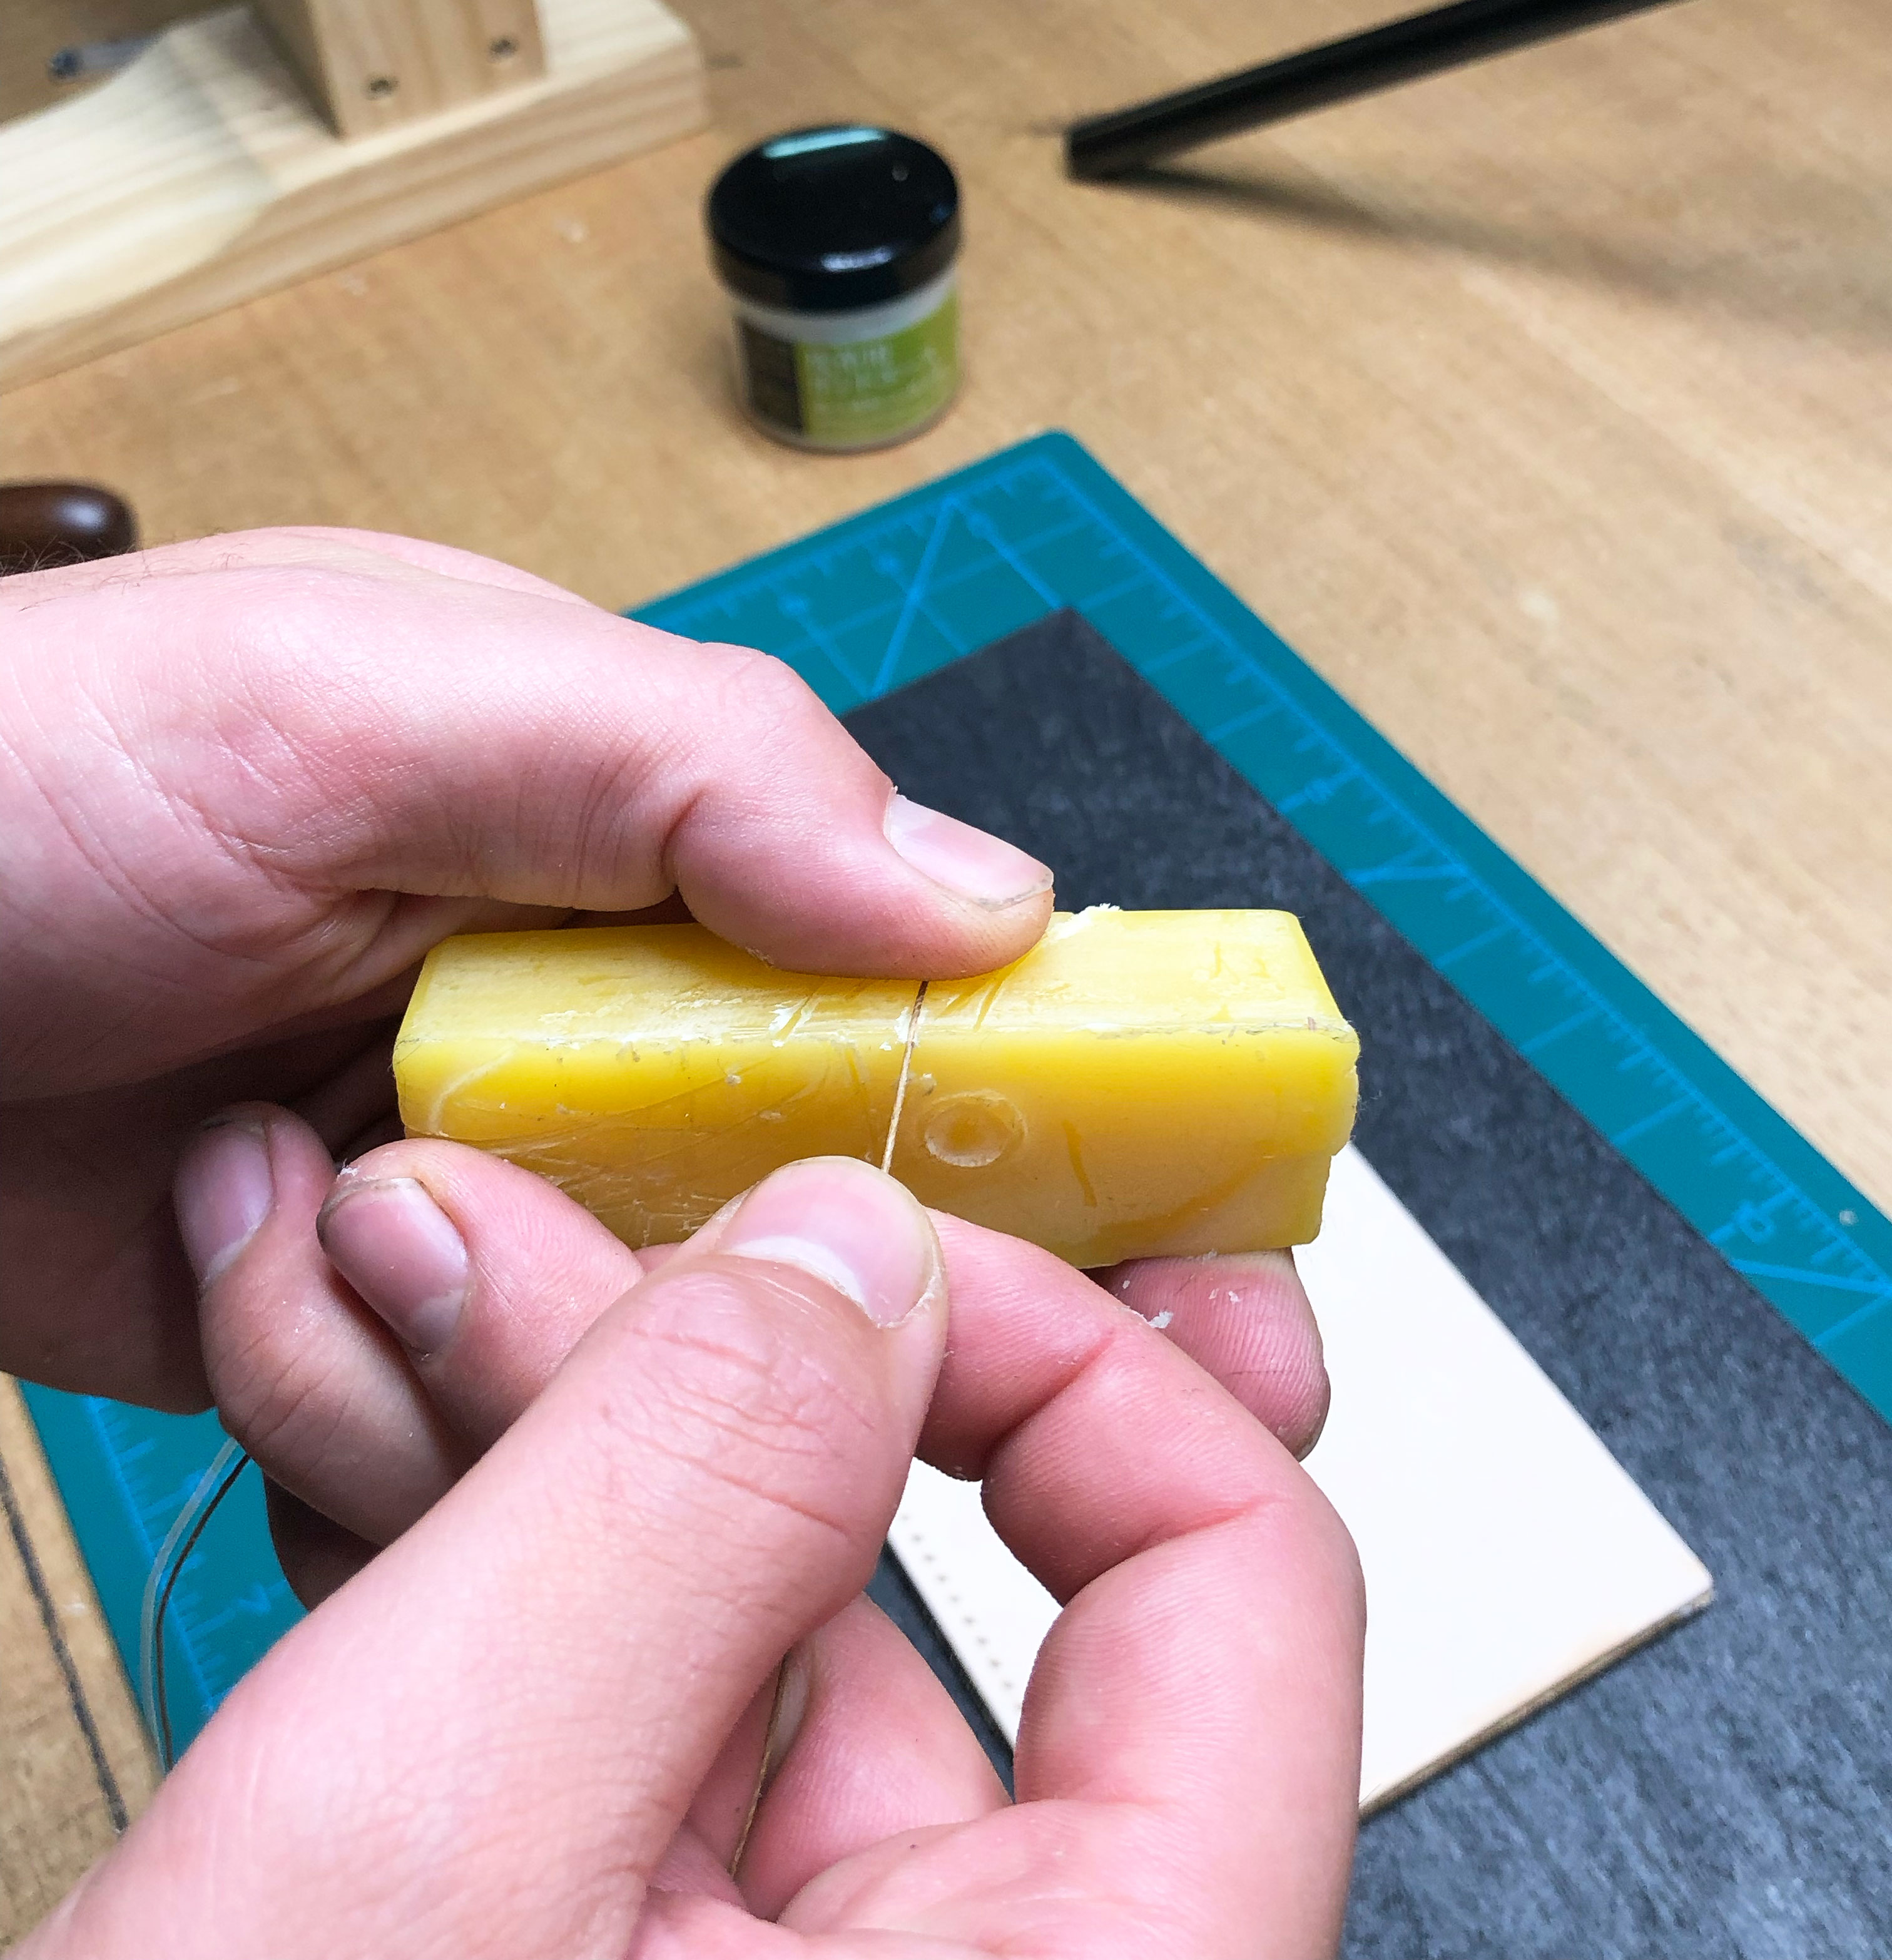
For your hand sewing, you can choose between: linen thread, polyester thread or MBT thread*. Here, we use glazed linen thread “au chinois” for its quality and strength.
*MBT sewing thread is a type of thread with a triangular shape that reflects light, adding a satin sheen to the thread.
Tip:
For the length of your thread, cut 4 to 5 times the length of your seam. Then run your thread through a bar of beeswax or a bar of Columbus wax (neutral colour) several times.
This step is crucial! Although glazed linen thread breaks are very rare, greasing your sewing thread is essential to guarantee the longevity and strength of your seam (it will also make it easier to pass through the eye of the needle).
Step 5: Preparing the round-tipped needles

Now it's time to pass the thread through the needles and the needles through the thread. Yes, you read that right! If you have poor eyesight, don't forget your glasses!
To prepare your needle, pass the thread through the eye of your needle, then leave a small length of thread sticking out, about 5 cm.
Once this is done, pass the point of the needle through your thread.
Tip:
To make it easier, pass your needle through your thread, you can "untwist" it: between your thumb and forefinger so you can slide your needle through. Make 2 or 3 passes.
Lastly, pull the thread towards the eye of the needle to make the knot; once this is done, repeat the same steps with the second needle.
All your materials are ready, now it's time to start sewing!
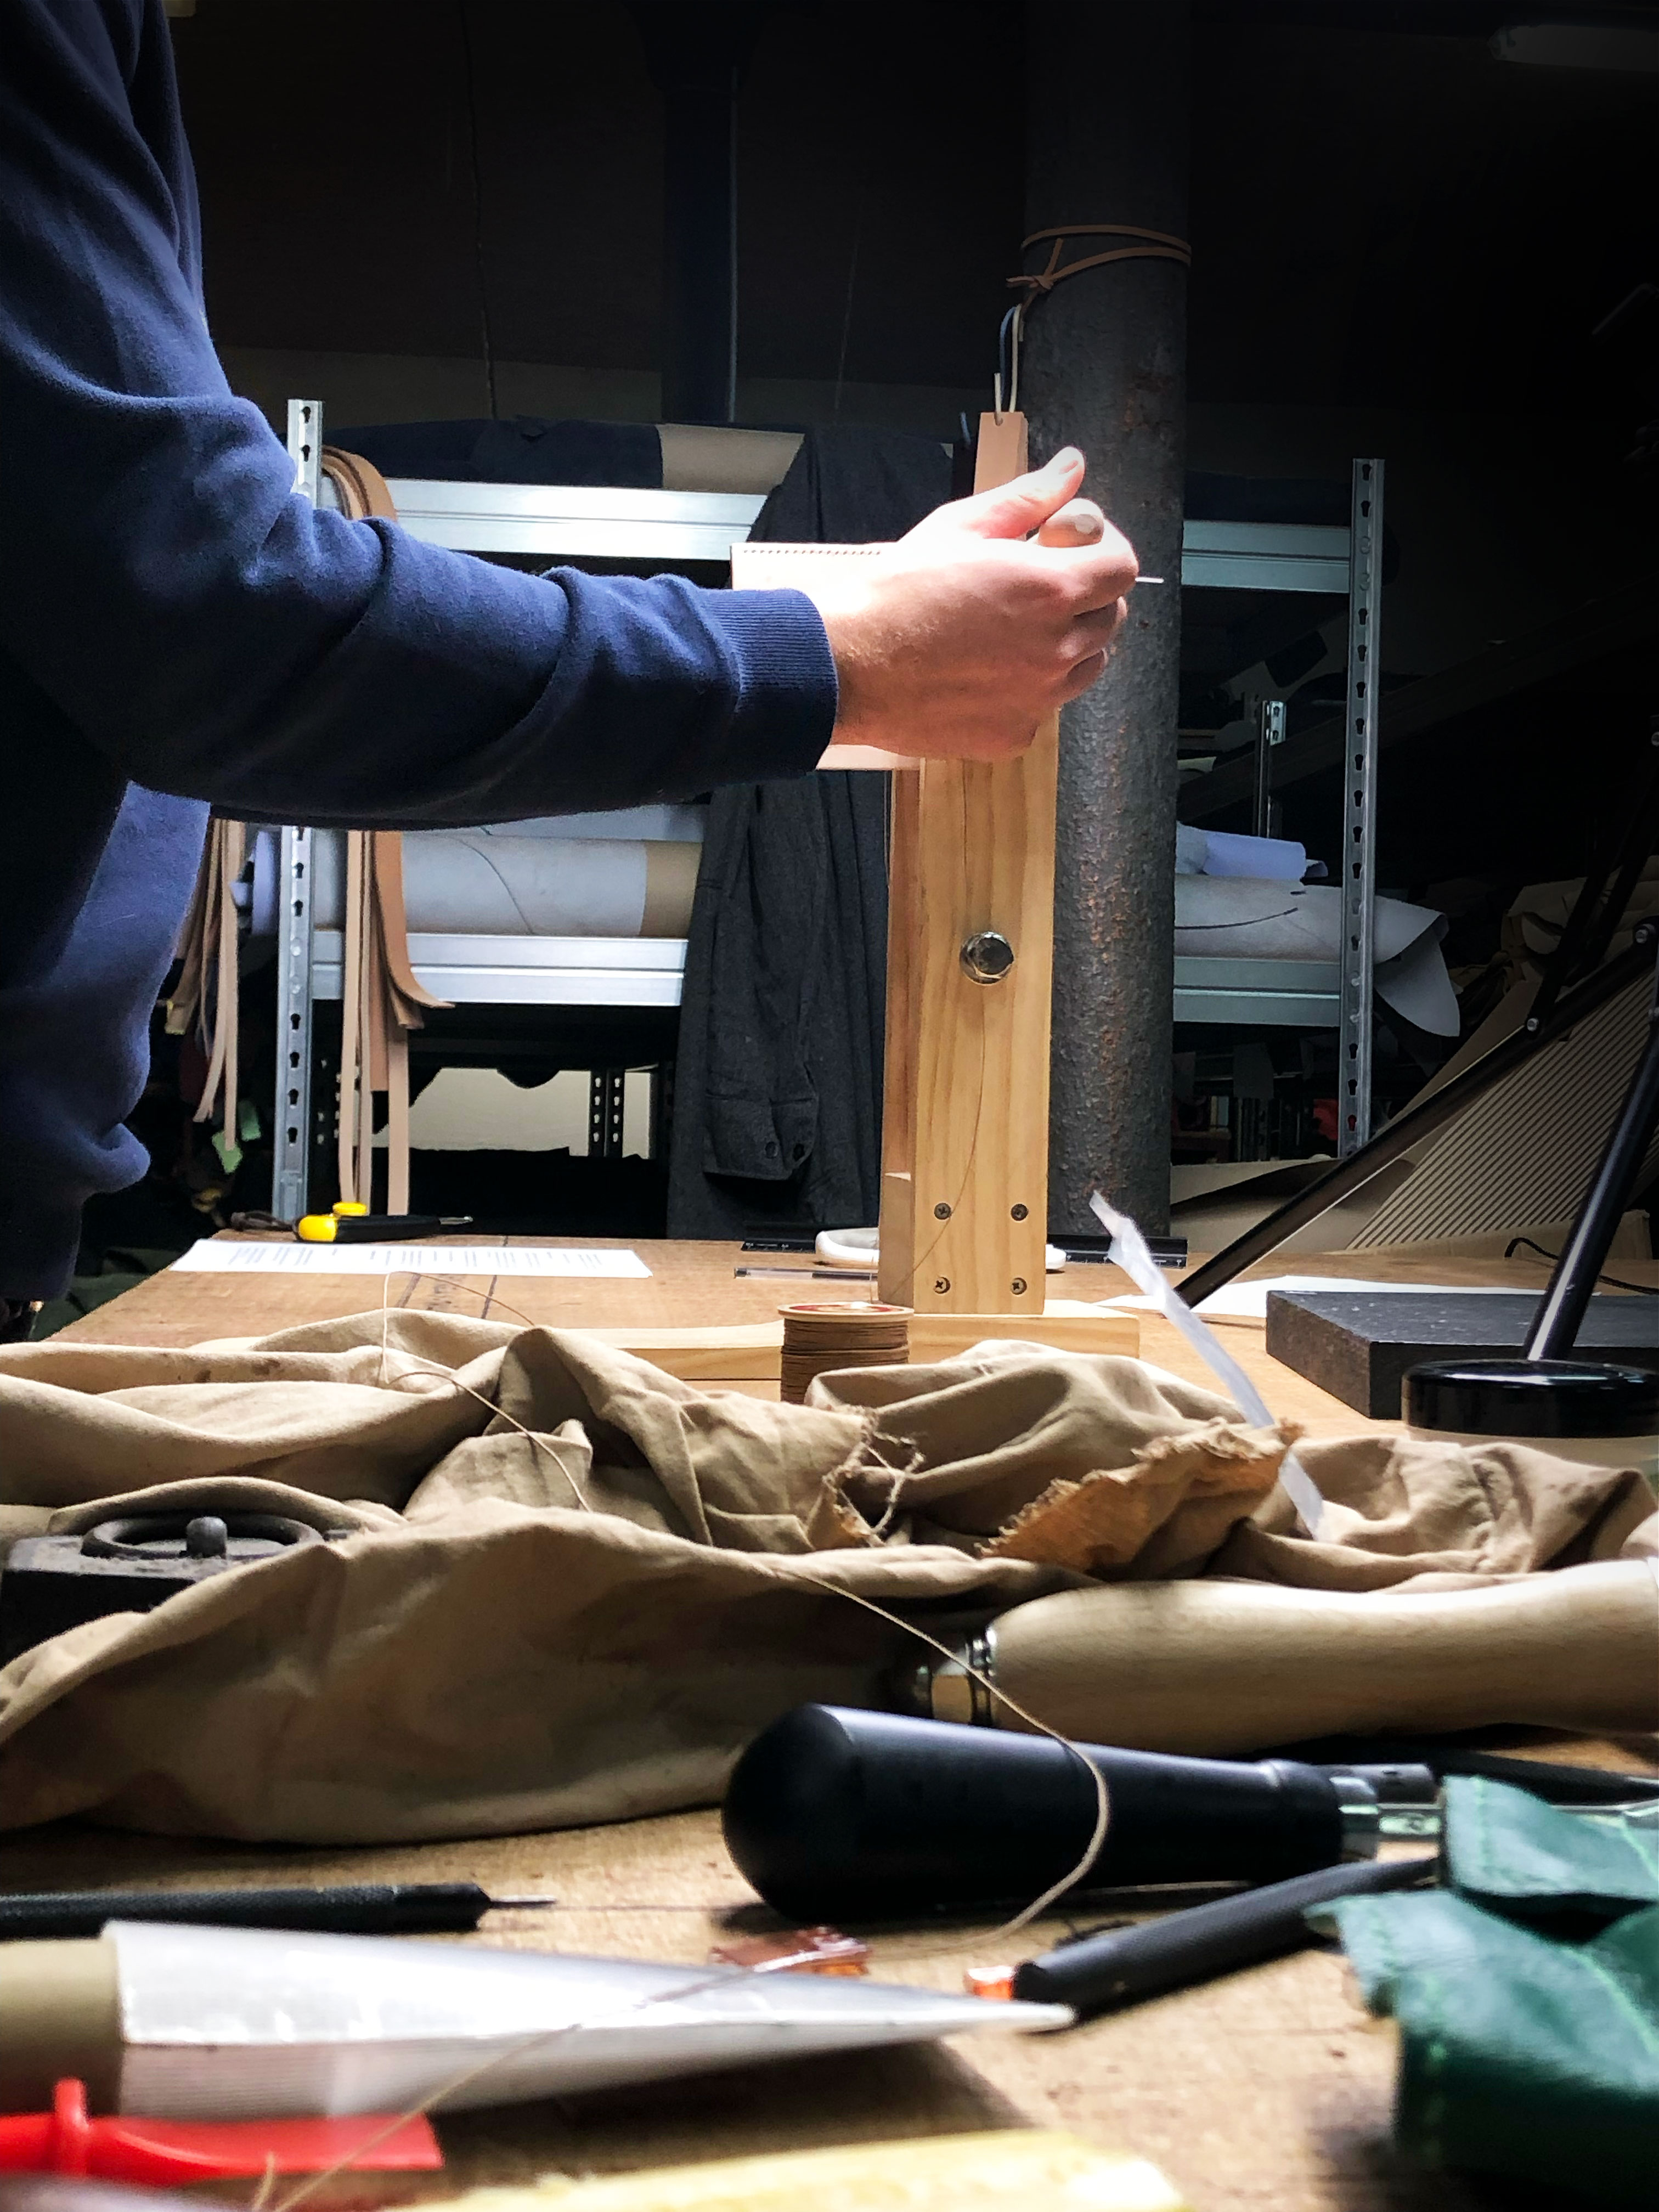
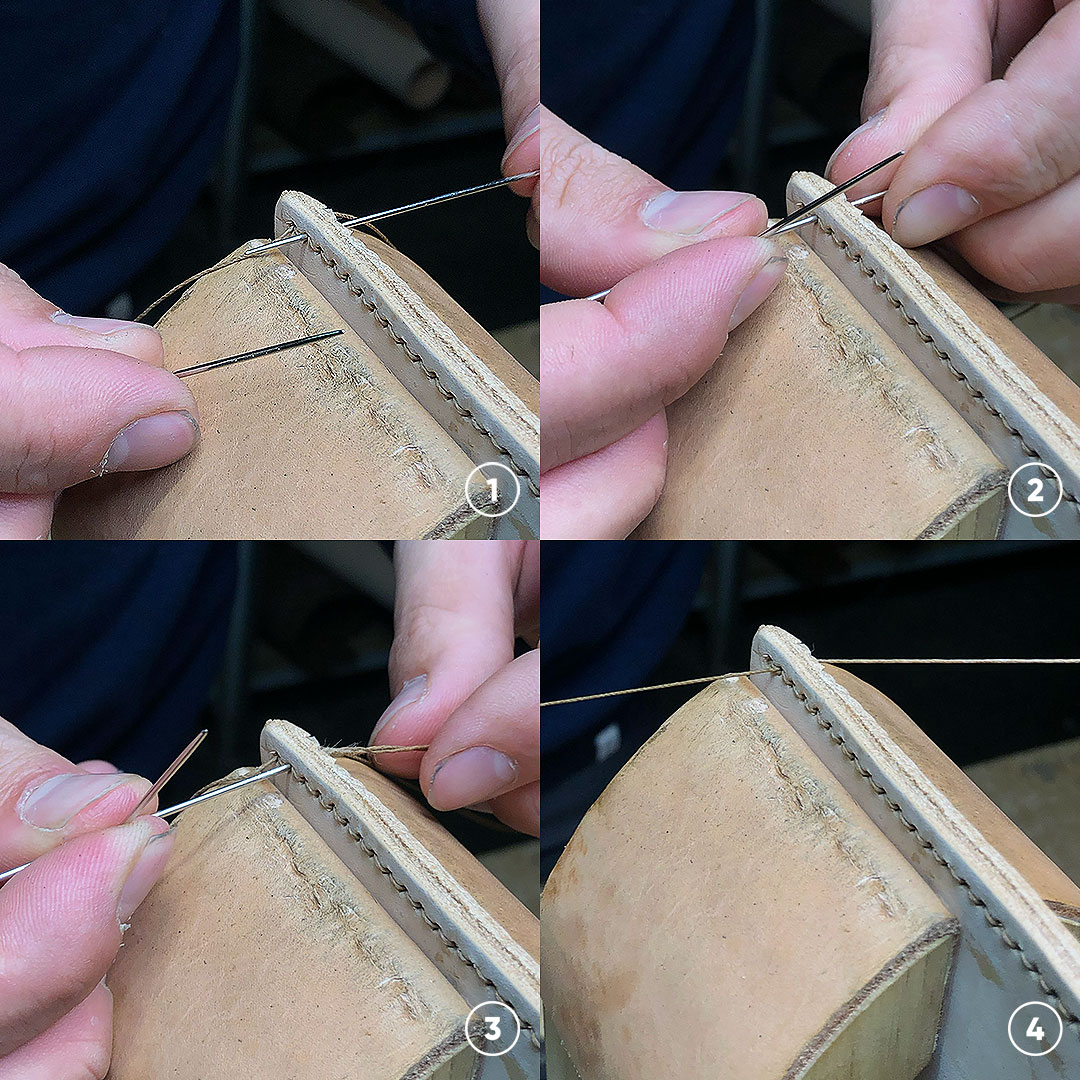
Step 6: Starting saddle stitch sewing

Start by wedge your creation in place into the wooden jaw, here we use a stitching horse* for greater stability. Remember to leave a small gap between your stitches and the wooden jaw (about half a cm).
*Stitching horse: wooden structure to be placed between your legs or under your thigh, ideal for holding your leather pieces while you sew.
For beginners, if you don't want to invest in a stitching horse, you can wedge your work in place with a boo, it's not ideal, but it's cheap!
Once everything is securely in place, pierce your leather with a stitching awl. The awl must be perpendicular to your seam (at a 90° right angle). Insert the diamond awl at the same angle.
Note that if you've managed to drill your holes directly with the diamond punch holes, you can skip this step (but make sure you have a round stitching awl, as sometimes the holes close up).
What's more, if you need to widen them, you won't be able to do so with a clamp awl, as this will distort your stitches!
Tip:
Start sewing on the side opposite you: in saddle stitch sewing, you always sew towards yourself!
Here we start on the 4th stitch so that we can make 3 double stitches at the end of our seam (the stop stitches).
It's important to know that the 3 starting stitches are not just aesthetic, they also serve to strengthen and solidify your seam…
To make your seam:
- Pass your needle with your left hand through the stitch (you can use the awl as a guide);
- With your right hand, grab the needle coming from the left and form a cross with the two needles;
- The left-hand needle comes over the right-hand needle, then pull the needle out of the stitch;
- Pull the thread you have just passed towards you on both sides of your creation, to insert the right-hand needle behind the thread;
- With your left hand, pass the thread you've pulled towards you over the right-hand needle you've just passed;
- Pull the needles on both sides diagonally, using your thumbs to tighten your stitch.
For left-handers, purists will tell you that a saddle-stitch seam is always done right-handed, but there are claws with the inclination reversed, which are generally used for very thick leather (to do the reverse side of the seam). It is also possible to follow the same method "in mirror".
Repeat the operation as many times as you need to sew your seam. It may seem a little complicated at first, but it soon becomes automatic. And your seams will become increasingly regular and straight over time.
Step 7 : Successfully stopping your seam:
Now that your seam is perfectly finished, it's time to secure it with locking stitches. To do this, make three locking stitches using a round awl to enlarge the holes without distorting them.
Then do the same thing, but this time don't loop over the needle. Once the locking stitches have been made, you can cut the thread flush and apply a stitch of glue.
Tip:
Use a cobbler’s hammer for your seam, striking gently so as not to mark the leather.
The end:
Congratulations, your hand sewing is finished!
In France,it's often said that a picture is worth a thousand words. So, you can watch a much more detailed video of this TUTO on our YouTube channel.
And of course, we invite you to read the other articles on our BLOG. You'll find advice, tips and technical information to help you become a real leather expert.
Instagram YouTube Facebook PinterestETSYReturn to the home page